Archive | Design RSS feed for this section

My 2 cushions at Ohh Deer’s ‘Pillow Fight’ competition

15 Sep

I have two cushions taking part in a cool competition called Pillow Fight. The authors of this idea are none other than Ohh Deer, an absolutely inspiring & intelligent British online/offline shop that sells quirky illustrated gifts, from pillows to T-shirts, and, in between, gift cards and stationary.

First, I’ll talk about my cushions, then a little bit about Ohh Deer.

A personal cushion story

  • This cushion is called: Nature v.s. Psycho-analysis. You can click here to see the pillow and to read the brief I wrote about it.

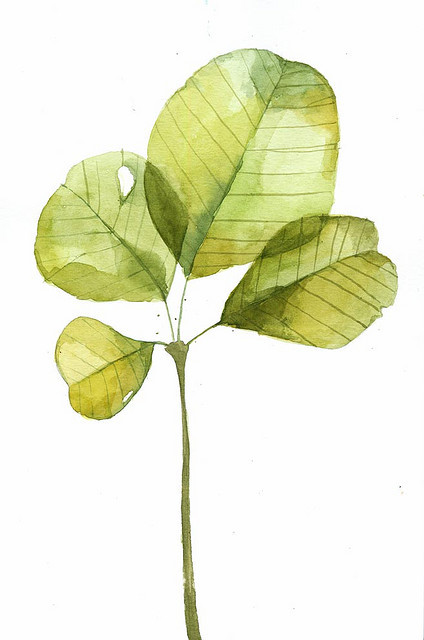
Technique-wise, this pillow “carries a photographed image of one of my hand illustrations using watercolor and acrylic,” and I forgot to mention, ink. So… a bit of recycling went into this pillow’s original illustration.

I’m not going to copy-paste the full brief, but I will quote myself  with: “This year, I started making botanical illustrations over yellowed book pages from my large library of New Age books. This is to celebrate the triumph of simplicity, and the return to nature, over complexity…  In other words, this pillow carries an intentional twist, where the botanicals signify the triumph of nature over 21st century melancholy.”

  • This cushion, below, is called: Triumph of Nature over Psycho-analysis. You can click here to see the pillow on Ohh Deer, and to read the brief.

This pillow is basically about: “Return to nature and you’ll find happiness.” Love the way the paper grain is showing around the psychoanalysis type and the watercolor/acrylic/ink illustration.

About Ohh Deer

Ohh Deer is about “Quirky Illustrated Gifts,” illustration and photography that can be so cute at times and outright vulgar, at others. This is basically what stuck in my head from the brief I read on their About Us page.

Here’s a quirky example from their online store, a card dubbed Emotional Baggage by Gemma Correll, followed by 2 Pillow Fight competition entries; the first one is called: Audio Cassette – By Simon Pilkington… and… The pillow called: Huntress – by Sandra Dieckmann:

To view some of my favorite designs and pillows from Pillow Fight & Ohh Deer’s collection, visit my Pinterest boards:
  1. Artisan’s Scrapb◎◎k
  2. Pillows.Cushions

Ohh Deer Blog…  & Pillow Fight

If you visit Ohh Deer’s blog, you will find delightful surprises. My most favorite post, so far, is called “Something a Little Different.” It comes with images from a recent Ohh Deer booklet design that carries their concept, a concept of growing together and being a role model for others once we have matured ourselves. So beautiful!

This is exactly how Ohh Deer runs their endeavor, it takes care of you as an artist, and you take care of them, in the spirit of love. They offer you 25% of purchases from your artwork –  once you have won the competition and became part of their contributing team. But before that they do promote you on their website just by entering their competition.

As for Pillow Fight, the deadline is September 25, so if you are interested, please click here to read the specifications and to enter! Good luck!

I learnt about this competition through fellow WordPress blogger, “London Drawings.” Please visit this lovely illustrator’s post where you can find 4 pillow designs by merchesico. Here’s a lovely example:

DIY | Mini Canvas & Chalkboard Stand {From Popsicle Sticks}

12 Sep

Popsicle sticks are made from trees; it’s such a huge waste to throw them away! What to do with them? They’re fragile and you can’t do something serious with them… unless it’s a miniature, like a mini stand for your cute little drawings, or handmade chalkboard signs to be used at craft shows.

Materials needed:

  • 4 Popsicle sticks
  • 2 Tooth picks
  • White glue – I used Bic White Glue
  • Craft knife or X-acto knife
  • Cutting mat or cardboard to protect your work surface
  • Some book pages to cover the cracks on the Popsicle sticks

How-to:

  • I initially wanted to create little holes in 3 popsicle sticks to insert a toothpick – to bind the three “feet” and to keep them free to fold and move. The Popsicle sticks cracked but did not break, so I inserted the top toothpick where the wood cracked… and quickly added a generous amount of wood glue to fix it in place and to prevent the three feet from breaking. It took some patience to engineer the tripod and balance the “feet.” The rear “foot” can swing back and forth if you want it to, and it’s safe to do so since the model is well glued and the paper strips kind of toughen up the miniature stand.
  • I glued the “shelf” on by adding a huge amount of wood glue. I decoupaged some strips of paper that came from an old book using a lot of white glue. This worked perfectly as extra support and as a decorative touch to hide the cracked wood.
  • I then added an extra tooth pick at the base of the mini “shelf” for extra support, again by applying a lot of glue.
  • One thing to remember though, you need to let the glue dry a bit before you move into the next step or the whole thing will fall apart. Patience is a virtue :  – )

This mini stand actually has a function other than being utterly cute and adorable:

You can use it in craft shows to place your brand name on it… or, if you make a few more stands, you can place cute little chalkboard signs on them to identify your craft work, homemade cookies, or handmade jewelry (bracelets, rings, earrings, etc). You can also display your miniature canvas (or cardboard) drawings and paintings with this stand. In your kitchen or dining room, if you have a corner for homemade olives and oils, sandwiches, cookies… you can place this stand with a sign that tells your dear ones “yummy things are served here.”

~~~~~~~~~~~~~~

Related Recycling/Packaging/Display Articles:

little-chalkboard-thumbtacks-3-by-karboojeh-handmade

DIY Table-setting Placemat | Pompom | Handpainted Floral & Botanical Design

6 Sep

I have a special thing for placemats. They can be made by hand, that’s one of their major attractions. And you can customize them to look exactly the way you want them to. You only need some basic sewing skills, some fabric colors, and a bit of imagination.

I have been dreaming about making my own placemats for quite some time, really. Recently I felt I was ready to make them since my sewing skills became a tad-bit better than they used to be.

The ingredients for making these cute placemats are:

  • Cotton fabric
  • Pom-pom trim, and individual pompom balls
  • Fabric paint and markers (I actually used more than one brand, but they all have pretty much the same ironing, and laundering instructions)
  • Sewing machine with the ability to sew a straight line
  • Flatware to trace around

I started by sewing the hems with the pompoms at one go.

Then I freehanded the word “eat” on a paper with pencil, while keeping in mind I wanted it to look like the vintage American Pop font.

I then traced the word on both placemats after taking measurements and centering it, also with pencil I used a basic image transfer technique using charcoal, for more ideas go here). I used the round lid of some cookie canister to trace the plate shapes. I then got me a real spoon and fork and traced around them (with pencil), that’s how I got the fltawre shapes. Once I was done with the basic outlines, I used a black fabric marker to outline them again, then I painted and sketched flowers and herbs to fill the plates.

The inspiration for making this specific design came from different places, which all have one thing in common: A vintage feel.

Inspiration: Table-setting placemats

I found a few table-setting placemats that I really liked. Here are a few ideas. The one above is so lovely, it has a vintage French feel, while the one below is a bit whimsical, especially that lace was used to create the place-setting utensils and plate shapes. So, if you don’t want to invest in fabric paint, you can simply applique the shapes.

Or you can use your basic embroidery skills to create this beautiful and simple placemat by Yellow Spool.

Source: u-createcrafts.com via Karboojeh on Pinterest

And of course, you can always upcycle a jean pocket to create a one-of-a-kind placemat.

Source: todaysnest.typepad.com via Karboojeh on Pinterest

You can actually use the pocket on its own, like this one below. All you need is cut the jean, then place the flatware inside for a cool table arrangement.

Source: bhg.com via Karboojeh on Pinterest

Here is another pocket placemat idea…

Source: bhg.com via Karboojeh on Pinterest

And, finally, a cute picnic placemat with multi utinsil pockets.

I hope you enjoyed today’s post. If you have any interesting placemat ideas, or, better still, if you have made your own placemats, please do share your link in the comments section below. Take care for now… K

———————–

Related Articles:

A glimpse into my atelier

9 Aug

I have been patiently tidying up – & crafting – my work space. I finally got around to put together a nice mood corner & desk. Here is a little glimpse.

I see myself as organizationally-challenged, but I am slowly & very patiently learning how to put everything in its place. You have no idea what this used to look like… and, em, no, I don’t think sharing a “before” photo is a good idea (ehem)… believe me,  imagine the worst ciaos and that would be “it”  –   hehe!

The challenge in putting together this atelier is that almost everything is handmade, and so it took some time to finish creating. The handmade items are:

  • Mood board (right): I used burlap, which I glued (using glue gun) on a piece of cardboard, and added the ribbon. At the bottom I stuck a piece of cork behind the ribbons.
  • Chicken wire mood board (left): I basically rolled some chicken wire around an old canvas frame, that I actually had since school. I didn’t staple or glue anything, just scrunched it round the frame.

  • Thumbtacks: Made those using several materials… including coins. Added a dab of E6000 to plain tacks and glued on some coins, plastic things from broken things, a bear’s face…
  • Chicken-wire lampshade, which I shared in a previous post right here.
  • Other handmade items are: White wire basket (for the pencils) and a mini wire-sculpted chair. Mini Chalkboard and chalkboard stand (a tutorial is on it’s way, hopefully!). Mini wire birdcage. Hand-painted tins (the ones under the lamp). Handmade flower magnets (using corn flour dough). Cement votive (it’s next to the tins, which are under the lamp). The botanical watercolor sketches are also mine. And other stuff.
  • Handmade bunting: Recycling old fliers I had into rectangle bunting, and there’s the mini paper flower garland, too.

So basically a bit of recycling, painting, and re-styling, went into there. What helped to tie the whole look together is the neutral shades of burlap, wood, and cork. As for the theme,  I went for a bit of British-chic in celebration of the Olympics.

Please do share links to your mood-boards, ateliers, or craft rooms if you feel like it.

Have a lovely day

———————-

Related Articles:

Packaging Jewelry 101: Upcycling Matchboxes

8 Aug

I have an infatuation with matchboxes, especially when they are repurposed into something else, like a little cute box for packaging my handmade earrings.

I had some glitter, some paint (yes, oil-paint for furniture), acrylic paint, white glue, and a stamp. And this is what I came up with.

The oil-based paint actually makes the matchboxes much more sturdier than they are. The stamped bird is made with foam. This stamped side of the matchboxes is actually painted with white acrylic, so that the ink would stick.

Matchbox inspiration

Here are some ideas for embellishing matchboxes. Some are shabby chic, some are not… but they’re all so beautiful.

Things to use upcycled  matchboxes for:

  • Packaging small jewelry items, like earrings and pins, broaches, and a strand of pearls – and using them in craft shows, for instance.
  • Organizing tiny office supplies – like clips, tacks, push-pins, rubber bands, etc
  • Stationary: You can put a stack of sticky notes (Post-it notes) on top of the matchbox and place a tiny pen in the “drawer” to make a quick notebook
  • Gifts: Wrapping a cute little gift (of candy, maybe) for a loved one
  • Miniatures: Making miniature drawers for small toy houses

Source: etsy.com via Karboojeh on Pinterest

One can come up with as many ideas as one can with this little drawer-shaped box. The possibilities are endless…

If you have any matchbox ideas or projects, please do share them. I created a Pinterest board for them, and I’m always on the lookout for cute little matchbox  ideas…
thanks!


Inspiration: The Laura Ashley floral fever

5 Aug

Source: flickr.com via Karboojeh on Pinterest

When I was a teenager (a few years ago, hehehe), I grew up with a few Laura Ashley skirts and floral accessories, and up until this day I continue to associate pretty pastel florals to this wonderful brand. Florals are now witnessing a big come back thanks to the school of ‘vintage-chic,’ which is celebrating everything beautiful my generation has seen the last drops of. We’ve been through the ‘ugly’ eighties, but we’ve captured the last offerings of the glorious 70’s, and florals seem to have managed to make their way into our lives up until the early 90’s.

The above pic shows a few Laura Ashley floral fabrics. They go together so well, although the motifs are different.

Below is a vintage-style bedroom with a country, yet contemporary, twist. The chest of drawers is from Laura Ashley as well as the vintage-style floral patterned accessories.

For more Laura Ashley accessories, I picked this floral mug  for you…

The vintage-chic style is probably the most among other trends that is celebrating florals in a big way. Vintage-chic stylists and bloggers are showing us ways to mix and match, and stack up on  florals upon florals in one location, in one room, which is exactly what I am liking recently. Look at this…

Source: flickr.com via Karboojeh on Pinterest

Source: poppytalk.blogspot.com via Karboojeh on Pinterest

Florals, which are a staple of the British aesthetic and the prairie trend, have also seen a come back into fashion lately. Belts and little floral details have appeared in this year’s spring/summer clothes and accessories.

Another brand name that celebrates full throttle florals is  Cath Kidston, whose take on florals is a bit different than the classic Laura Ashley line, but all the same I love them both (I did mention this earlier in a previous post). Here is an example of Kidston’s accessories.

I also found florals from other brands,  such as this mug, which ultimately reminds us of Laura Ashley’s style.

Finally, this is my biggest floral crush… vintage floral cards. Yum.

And this one here….

Source: umla.tumblr.com via Karboojeh on Pinterest

Ok, then, I’ll leave you with a flowery and sunny day, hopefully, and see you next time,

K

DIY Prettier Magazine Files

30 Jul

This slideshow requires JavaScript.

In the spirit of continuing the theme of pretty organizing, I noticed that when I place things in beautiful containers and storage solutions, they get an instant promotion around the craft room: From being a merely functional “thing” to a piece of “love” that you want to place in a prime location.

In this DIY, I basically upgraded 3 magazine files by attempting a wall-paper look. This is inspired by the lovely bird magazine files that are at the bottom of this post, and which I mentioned previously.

This is how these poor black files got their promotion up into a much nicer shelf at my workspace. The files are a bit unsteady since they are old, and I did stack up more magazines than they could hold, so they are puffy at the edges.

I had a difficult time deciding whether to decoupage the files or paint them. I had some nice damask wall-paper, but it looked too patterned, too well-finished for the look I was looking for.

So I decided to use:

  • Acrylic paint (white, pink, green)
  • Foam stamp (Motif: Grapes)
  • Brush

Method:

  1. I started by free-handing the shape of a pink bird, as if perched on a branch. I found an illustration of a bird and placed it in-front of me to help me keep the proportions right while I painted. I decided to paint the bird on two magazine files (I just had to hold them real tight as I sketched the shape). This is so that the final image would give the impression of a whole big painting that was cut into 3 parts (just like the original wall-paper idea was).
  2. I stamped the grapes around the bird arbitrarily after dabbing acrylic colors on the foam stamp (pink on the grapes, green on the leaves), but the lines were too thin, so I decided to take advantage of this and add a vintage-y touch by dabbing paint here and there, on the leaves, around the grapes themselves, and around the bird.
  3. I touched up some areas with light pink or white to hide mistakes.

The inspiration

Yes, here it is… the beautiful inspiration that got me thinkin’ about changing the look of my files.

The design of the files in the above pic is by British stylist Marie Nichols, whose blog  is so inspiring.

———————–

Related Articles:

Organizing 101: Ideas for pretty storage

18 Jul

Sometimes when we embark on organizing our drawers, we end up putting our “inner” house in order. I once read a book that taught me a very important lesson about taming inner confusion… start with your surroundings!

Twelve years ago I used to take 3 bags to work (in addition to a big pile of newspaper clippings, files, and documents). I was a big mess. I was zero at organizing anything, and I had a bit of an OCD challenge back then (OCD = Obsessive Compulsive Disorder). I actually found out about the possibility that I might be a little bit “special” when I read an article – in the UK edition of Cosmopolitan – about a woman who suffered from OCD.  She couldn’t throw anything away (not to mention give out things for charity), she even kept clothes tags, and empty perfume bottles, thinking that she might need them one day. Which of course, added to the cluttered house (and life she led).

Source: bhg.com via Karboojeh on Pinterest

So, from that day onwards I consciously  started working on my clutter problem. I started sorting out my room, files, bag. And up until this day, I am always looking for solutions for organizing life.

Later on in life I read a book by a women who managed to change her life, get rid of toxic relationships, and start anew, by starting to de-clutter both her immediate physical space, and her mind’s and heart’s inner space.

Organizing can go much farther than offering your guests a tidy living room. It’s a way of being.

That said, I hope you enjoy the few ideas I have collected over the past few months. I did manage to pull a few off :)

Tip: Pretty makes you want to organize

I’m in a new stage now. It’s not about just organizing and stacking things the right way, it’s also about pretty storage, this makes the whole organizing journey so much more fun!

This (above) is my number one favorite –  for creating pretty storage. The idea of decoupaging magazine files with pretty wallpaper  is by British stylist Marie Nichols.
I wish you all a de-cluttered life and much love to come your way…

——————

Related Articles:

Inspiration: British-chic in vintage & contemporary hues

4 Jul

I love it when artists and designers take classical objects and shed new color and light on them. This is the case of these iconic London teapots and phone booths.

The first one up is a beautiful rendition of the British phone booth. Wouldn’t you love to have tea in a teapot that looks so English?

A British phone booth in pink is just so cute;  just by applying an unexpected color hue, you have yourself a beautiful piece of art. And a ceramic teapot with vintage roses, brings a different dimension to the classical British teapot (although I think the said teapot – below –  is from an Australian shop, ehem).

Source: flickr.com via Karboojeh on Pinterest

How about a Union Jack pillow; but this time it comes with vintage-romantic colors, like this one here? And the Union Jack floral cozy – by Monsoon – right below it?

Absolutely beautiful!

Source: lnt.com via Karboojeh on Pinterest

Source: via Karboojeh on Pinterest


The placemat above is a DIY by the people at Laura Ashley’s Blog, titled: How to make a ‘Union Jack Cutlery Roll’… yet, another Union Jack design, with not-your-usual colors. So cute, isn’t it?

And let’s not forget, British contemporary-chic, found at an online store owned by British stylist Marie Nichols – called  The Shop at Number 57 – with it’s cute contemporary-vintage British art.

Here we have the Queen’s stamp, reinterpreted into a white-and-black cross-stitch design nestling gracefully in a round embroidery hoop. So cute! You also have the Union Jack, and the Royal Crown, also in a black-and-white contemporary rendition of a vintage theme! A beautiful collection!

~~~~~~~~~~~~~~~~~

Luckily, I have a London postcard of a two-level red bus that I bought in my before-last visit; this will keep me London-satisfied for a while! I mean you can’t just see all of this beauty and not want to have it in your craft room!
The Frugal Crafter Blog

Groovy craft projects, crafty recipes and other artsy stuff.

Illustrated Bites

an illustrated food blog

Dream Green DIY

An indie handmade jewelry & crafts creation house

from Hell to Breakfast

bustin' a 5-year-old crafts hoard, one bloody button at a time

W E S E E R A I N B O W S

//dream in color//

Stuff I’ve been drawing

Illustration and graphic design - don’t be shy and say hi at mercedesleon@merchesico.com

EASYBAKED

a collection of recipes

What Katie Made

The best DIY projects. Your wallet will thank me later.

The Importance of Being Quirky

May Your Days be Filled with Love, Good Health, Smiles, and Umbrella Drinks!

thehighnotedotnet

vintage music and the high notes of life

Life.Style.etc

Chic, unique and inspired ideas... as spotted by the team at Livingetc

My So Called Crafty Life

The life and times of a craft addict

The Window Display Blog

Images and words on the best displays around London

If We Took A Holiday

108 days around the world

Niki Fulton

looking at colour and form

The Unexpected Chic - Interior Design, Decorating, Inspiration for home

Fresh interior design, decorating ideas and inspiration for your home

Custom Art and Design

Neurotic. A Jane-of-all-trades. Genetically diverse. Interior designer. Artist. Upcycler. Volunteer. Dreamer...♥

hovercraftdoggy

A curated glimpse into a world of infinite beauty and creativity.

Parcel Post

An indie handmade jewelry & crafts creation house

button, button ...

I embroider and knit. A lot.

paper, plate, and plane

A world of crafting, entertaining, and travels.

A Pocketful of Notes

Sharing ideas and thoughts...one note at a time.

Jackie's blog

Sharing with you a little stampin' and scrappin'

Re-Creations Project

Upcycling and Craft for All Abilities

buubok

Modern Knits for Interior

Tiny Octopus Designs

Selling Cephalopods

stashburning

what I make, thrifting and more

Thrift Shopping Buzz

Stay stylish & fabulous without spending a fortune. One store at a time.

Sweet Pea's Kitchen

A food blog with healthy simple and tasty recipes.

twistedsisters

Sisterhood of the creative force!

Butterscotch Tabby

A journal where I contemplate, outloud, what I may "make" rather than "buy" that remains useful, yet attractive little pieces of art. A review blog that combined with a little frugality can greatly enrich your lifestyle. Check out my store for a source of low cost creative supplies: www.butterscotchtabby.com