Tag Archives: tutorial

DIY | Mini Canvas & Chalkboard Stand {From Popsicle Sticks}

12 Sep

Popsicle sticks are made from trees; it’s such a huge waste to throw them away! What to do with them? They’re fragile and you can’t do something serious with them… unless it’s a miniature, like a mini stand for your cute little drawings, or handmade chalkboard signs to be used at craft shows.

Materials needed:

  • 4 Popsicle sticks
  • 2 Tooth picks
  • White glue – I used Bic White Glue
  • Craft knife or X-acto knife
  • Cutting mat or cardboard to protect your work surface
  • Some book pages to cover the cracks on the Popsicle sticks

How-to:

  • I initially wanted to create little holes in 3 popsicle sticks to insert a toothpick – to bind the three “feet” and to keep them free to fold and move. The Popsicle sticks cracked but did not break, so I inserted the top toothpick where the wood cracked… and quickly added a generous amount of wood glue to fix it in place and to prevent the three feet from breaking. It took some patience to engineer the tripod and balance the “feet.” The rear “foot” can swing back and forth if you want it to, and it’s safe to do so since the model is well glued and the paper strips kind of toughen up the miniature stand.
  • I glued the “shelf” on by adding a huge amount of wood glue. I decoupaged some strips of paper that came from an old book using a lot of white glue. This worked perfectly as extra support and as a decorative touch to hide the cracked wood.
  • I then added an extra tooth pick at the base of the mini “shelf” for extra support, again by applying a lot of glue.
  • One thing to remember though, you need to let the glue dry a bit before you move into the next step or the whole thing will fall apart. Patience is a virtue :  – )

This mini stand actually has a function other than being utterly cute and adorable:

You can use it in craft shows to place your brand name on it… or, if you make a few more stands, you can place cute little chalkboard signs on them to identify your craft work, homemade cookies, or handmade jewelry (bracelets, rings, earrings, etc). You can also display your miniature canvas (or cardboard) drawings and paintings with this stand. In your kitchen or dining room, if you have a corner for homemade olives and oils, sandwiches, cookies… you can place this stand with a sign that tells your dear ones “yummy things are served here.”

~~~~~~~~~~~~~~

Related Recycling/Packaging/Display Articles:

little-chalkboard-thumbtacks-3-by-karboojeh-handmade

DIY Table-setting Placemat | Pompom | Handpainted Floral & Botanical Design

6 Sep

I have a special thing for placemats. They can be made by hand, that’s one of their major attractions. And you can customize them to look exactly the way you want them to. You only need some basic sewing skills, some fabric colors, and a bit of imagination.

I have been dreaming about making my own placemats for quite some time, really. Recently I felt I was ready to make them since my sewing skills became a tad-bit better than they used to be.

The ingredients for making these cute placemats are:

  • Cotton fabric
  • Pom-pom trim, and individual pompom balls
  • Fabric paint and markers (I actually used more than one brand, but they all have pretty much the same ironing, and laundering instructions)
  • Sewing machine with the ability to sew a straight line
  • Flatware to trace around

I started by sewing the hems with the pompoms at one go.

Then I freehanded the word “eat” on a paper with pencil, while keeping in mind I wanted it to look like the vintage American Pop font.

I then traced the word on both placemats after taking measurements and centering it, also with pencil I used a basic image transfer technique using charcoal, for more ideas go here). I used the round lid of some cookie canister to trace the plate shapes. I then got me a real spoon and fork and traced around them (with pencil), that’s how I got the fltawre shapes. Once I was done with the basic outlines, I used a black fabric marker to outline them again, then I painted and sketched flowers and herbs to fill the plates.

The inspiration for making this specific design came from different places, which all have one thing in common: A vintage feel.

Inspiration: Table-setting placemats

I found a few table-setting placemats that I really liked. Here are a few ideas. The one above is so lovely, it has a vintage French feel, while the one below is a bit whimsical, especially that lace was used to create the place-setting utensils and plate shapes. So, if you don’t want to invest in fabric paint, you can simply applique the shapes.

Or you can use your basic embroidery skills to create this beautiful and simple placemat by Yellow Spool.

Source: u-createcrafts.com via Karboojeh on Pinterest

And of course, you can always upcycle a jean pocket to create a one-of-a-kind placemat.

Source: todaysnest.typepad.com via Karboojeh on Pinterest

You can actually use the pocket on its own, like this one below. All you need is cut the jean, then place the flatware inside for a cool table arrangement.

Source: bhg.com via Karboojeh on Pinterest

Here is another pocket placemat idea…

Source: bhg.com via Karboojeh on Pinterest

And, finally, a cute picnic placemat with multi utinsil pockets.

I hope you enjoyed today’s post. If you have any interesting placemat ideas, or, better still, if you have made your own placemats, please do share your link in the comments section below. Take care for now… K

———————–

Related Articles:

Packaging Jewelry 101: Upcycling Matchboxes

8 Aug

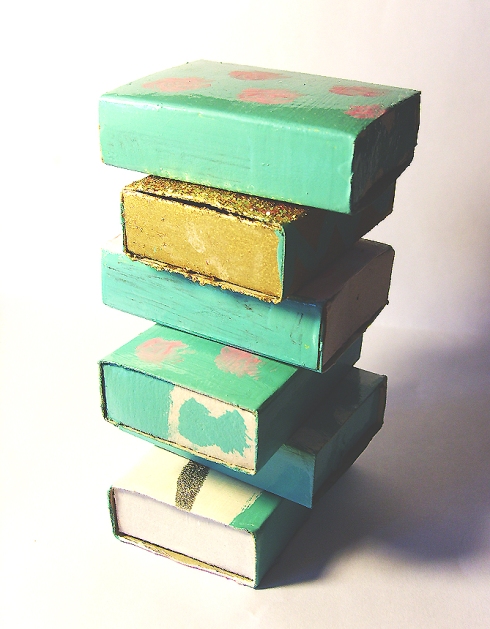
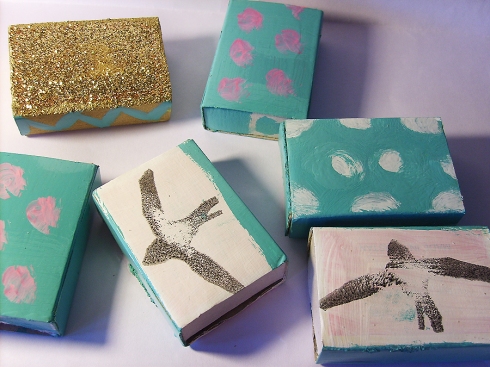
I have an infatuation with matchboxes, especially when they are repurposed into something else, like a little cute box for packaging my handmade earrings.

I had some glitter, some paint (yes, oil-paint for furniture), acrylic paint, white glue, and a stamp. And this is what I came up with.

The oil-based paint actually makes the matchboxes much more sturdier than they are. The stamped bird is made with foam. This stamped side of the matchboxes is actually painted with white acrylic, so that the ink would stick.

Matchbox inspiration

Here are some ideas for embellishing matchboxes. Some are shabby chic, some are not… but they’re all so beautiful.

Things to use upcycled  matchboxes for:

  • Packaging small jewelry items, like earrings and pins, broaches, and a strand of pearls – and using them in craft shows, for instance.
  • Organizing tiny office supplies – like clips, tacks, push-pins, rubber bands, etc
  • Stationary: You can put a stack of sticky notes (Post-it notes) on top of the matchbox and place a tiny pen in the “drawer” to make a quick notebook
  • Gifts: Wrapping a cute little gift (of candy, maybe) for a loved one
  • Miniatures: Making miniature drawers for small toy houses

Source: etsy.com via Karboojeh on Pinterest

One can come up with as many ideas as one can with this little drawer-shaped box. The possibilities are endless…

If you have any matchbox ideas or projects, please do share them. I created a Pinterest board for them, and I’m always on the lookout for cute little matchbox  ideas…
thanks!


DIY Prettier Magazine Files

30 Jul

This slideshow requires JavaScript.

In the spirit of continuing the theme of pretty organizing, I noticed that when I place things in beautiful containers and storage solutions, they get an instant promotion around the craft room: From being a merely functional “thing” to a piece of “love” that you want to place in a prime location.

In this DIY, I basically upgraded 3 magazine files by attempting a wall-paper look. This is inspired by the lovely bird magazine files that are at the bottom of this post, and which I mentioned previously.

This is how these poor black files got their promotion up into a much nicer shelf at my workspace. The files are a bit unsteady since they are old, and I did stack up more magazines than they could hold, so they are puffy at the edges.

I had a difficult time deciding whether to decoupage the files or paint them. I had some nice damask wall-paper, but it looked too patterned, too well-finished for the look I was looking for.

So I decided to use:

  • Acrylic paint (white, pink, green)
  • Foam stamp (Motif: Grapes)
  • Brush

Method:

  1. I started by free-handing the shape of a pink bird, as if perched on a branch. I found an illustration of a bird and placed it in-front of me to help me keep the proportions right while I painted. I decided to paint the bird on two magazine files (I just had to hold them real tight as I sketched the shape). This is so that the final image would give the impression of a whole big painting that was cut into 3 parts (just like the original wall-paper idea was).
  2. I stamped the grapes around the bird arbitrarily after dabbing acrylic colors on the foam stamp (pink on the grapes, green on the leaves), but the lines were too thin, so I decided to take advantage of this and add a vintage-y touch by dabbing paint here and there, on the leaves, around the grapes themselves, and around the bird.
  3. I touched up some areas with light pink or white to hide mistakes.

The inspiration

Yes, here it is… the beautiful inspiration that got me thinkin’ about changing the look of my files.

The design of the files in the above pic is by British stylist Marie Nichols, whose blog  is so inspiring.

———————–

Related Articles:

Crafty DIY: How to paint a romantic basket

30 Jun

How to update an old basket with a romantic motif | By Karboojeh Handmade

I finally came around to update this basket! I’ve had this basket for years: I love the shape and the wicker, but the oil stains always bothered me so much, even if they hid under a doily or a cloth.

So, I decided to update my cute little basket/tray, and my inspiration came from a mixture of “shabby chic,” French romantic,” “vintage romantic,” and floral prints by Laura Ashley & Cath Kidston.

How to update an old basket with a romantic motif | By Karboojeh Handmade

The tools I needed were:

  • Wicker tray/basket
  • Acrylic paints in pastels and cool hues
  • White glue (or varnish) to seal the work. You can of course use Mod Podge to seal the work
  • Brushes
  • Water to clean the brushes in between colors

So, what I did was basically the following:

  • I wiped the basket clean with a wet cloth
  • Applied a coat or more of white acrylic paint, and I deliberately made an imperfect job,  hoping to achieve a “shabby chic” effect
  • Painted little rosettes with pink and white acrylic paints, and I used a vintage green for the leaves
  • Once the paint was dry, I sealed the work surface with white wood glue.

And that’s it, basically.

How to update an old basket with a romantic motif | By Karboojeh Handmade

I’m planning to post a tutorial soon on how to paint those lovely rosettes. It’s a mind-blowing-ly simple technique, you’ll feel like a master of arts when you get the hang of it.

Ok, folks, I hope you enjoyed this tutorial. Cheers

———————————

This post participated in this link party:

Tip Jinkie :: Homemade Projects – Linky party – 14/8/2012

Decor How-To 101: Stenciling Secrets

30 May

Source: bhg.com via Karboojeh on Pinterest

Stenciling is a great way to spruce up anything from a wall to a bag. I have tried a few stenciling projects, some worked and others looked dodgy on the edges (because of too much pain applied on the brush). I just found some tips that will help avoid a stencil project going “hmmmm, not what I expected, really!”

Let me start with the tips I just found on BHG

Source: bhg.com via Karboojeh on Pinterest

BHG’s Stencil Secrets

“Use a foam pouncer or a specialty stencil brush.” They usually look round with a flat tip and dense bristles. “Standard painter’s brushes work well for touching up edges at the end of the process.”

The important thing in stenciling is: “Don’t overload your brush or foam pouncer with too much paint. Lightly dab the pouncer onto the surface of the paint. Blot off any excess paint on a paper towel or newspaper. The brush or pouncer should be nearly dry. A dry brush or pouncer prevents paint from seeping under the stencil, which leaves behind messy edges.”

“Circular logic. Apply paint using a pouncing motion – gentle up-and-down dabbing – within the lines of the stencil. Work in a circular motion, beginning in the center. Clean sweep. If your project or pattern requires repeat use of the stencil, wipe excess paint off between applications.”

Stencil This: Roman Shade Tutorial

Source: bhg.com via Karboojeh on Pinterest

There are so many stenciling projects to try out there. The kitchen is one area of the home that can accommodate a few stencil finishing touches. To create the Eat roman shade stencil in the pic (above), you can basically “Print letters one per page in your favorite font. For the silverware, check the Internet or clip art books for an image and enlarge it on a photocopier. Put the patterns under the shade and trace in pencil, then outline with black fabric marker and shade as needed. Hang shade and tack the trim to the window.”

Wondering about how you should center the letters? “For a perfectly centered and spaced word, start with the center letter, then add the next one to the right, then to the left, and so on.”

Stencil projects from around the net

DIY: Karboojeh handmade felt notebooks for inspiration

12 May

Inspiration felt notebooks are so fun to make. All you need is a few ingredients and some imagination. Attention to detail is important, but once you start your first book, experimenting with different materials & ideas makes the project so enjoyable.

Karboojeh handmade felt notebooks: While upcycling old book pages

For this project, you need:

  • Felt
  • A4 paper
  • Old book pages
  • Ribbon (to wrap around and through the felt book).
  • Cork & Pearl-head pins.
  • Sequin & confetti (optional)
  • Dimensional puff paint in the color of your choice (I used gold) – (optional)
  • Tools: stapler, glue gun, scissors, ruler, x-acto knife or paper cutter, pencil, self-healing cutting mat or piece of cardboard.
  • Additional: You can make your own embellishments, like the golden tassel in the first pic.

Packaged handmade felt notebooks – by Karboojeh Handmade

The idea behind these felt books is “inspiration.” They’re supposed to be like an inspiration journal. That’s why they come with goodies, stacked in the back of the package (as seen below). I put some hand-cut stickers, handmade envelopes, clips, confetti, and little things that can turn this little felt book into a fun personal inspiration book.

Felt notebooks packaging comes with goodies for better inspiration

The embellishment and the goodies are all up to you, and to the materials available at hand. You can make plain books or over-the-top books. And you can end up selling them, like I did.

The tutorial that inspired me to make these cute felt sketchbooks is this Felt Lover’s Mini Notebook – by antidotestudioblog.wordpress.com. Thanks for the inspiration :)

Tutorial: How to make a stamp by burning wood

2 Apr

The other day I spotted this photo tutorial for making a wax stamp. I thought that maybe I can make one for paper… and even fabric. So here is my version of a burnt-wood stamp using soldering gun and a few other materials.

You need:

  • A piece of wood
  • Soldering gun
  • Pencil
  • Craft foam sheet
  • Sponge brayer
  • Acrylic colors
  • A plastic plate for the acrylic paint

Steps:

Trace the stamp text or image with a pencil on the piece of wood (make sure it’s in reverse). Heat your soldering gun and start burning the wood using little dots, then connect them as the gin gets hotter. Apply some acrylic paint to the plastic plate and roll the brayer with the paint until it gets covered evenly. Apply the paint even over your wooden stamp.

Place a piece of foam under the paper you intend to stamp, so that you get all the nooks of the stamp; this isn’t a rubber stamp, so it won’t leave a good print if you use it on a hard surface.

That’s it! I love the end result. It’s not clean and shiny, but it’s got lots of character. I’ve used my stamp to label some of my craft work. I basically stamp the signature on paper, cut it to size then mod-podge it to the back of my craft project to label it. I haven’t tried this on fabric yet, but I think applying the right amount of paint and using foam under the fabric might get me good results.

Happy stampin’ everyone :)

Karboojeh

Naturally Homemade: Grandma’s alum recipe instead of commercial deodorant

30 Mar

Pic via jasminechemical.com

When I was 17, my grandmother told me to stop using deodorants since they blocked the perspiration glands.  Deodorants are dangerous to our bodies… nature has always offered us ways to beautify and clean ourselves. Why not use alum (i.e Shabbeh – شبة) instead?

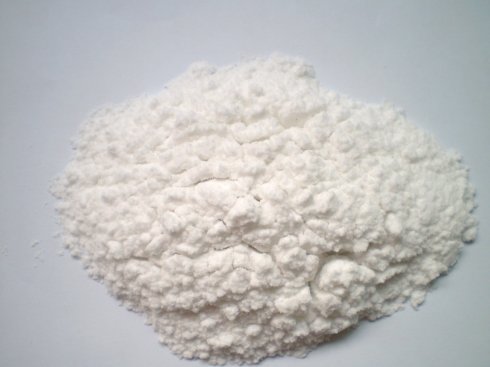
Alum is not short for aluminum. It’s a natural stone, that once crushed into tiny crystals can be your personal hygiene’s best friend.

Pic via ehow.com

Aluminum, on the other hand, is a harmful component that is used in many of the manufactured deodorants out there!

Grandma, may she rest in peace, told me that over time the blocked sweat caused by commercial deodorants will accumulate under the skin and rot, and I will start to really smell, which means I will need more deodorant to cover it up. Ultimately this blocked perspiration is a form of toxin that is locked within the body… it will harm it.

As a nature-lover, my grandma hated manufactured cosmetics, and always opted for natural remedies to fix everything. She had great insight and respect for the ways of her grandparents. She didn’t need a scientific report to tell if unnatural cosmetics were harmful or not, she knew it innately. And I believed her.

Pic via dipity.com

Alum talc-like deodorant

My grandmother’s basic alum recipe – You can use this recipe like you use talc:

  • Crush some alums until they become a bit rougher than talc (if they’re not already crushed) – about 7 tablespoons of it (or more if you like).
  • In my part of the world you can buy already crushed Musk powder, which is then added to the alum (let’s say about 1/2 a tablespoon), and it gives it a celestial smell. You can check out your area for any oriental shops & ask them if they have it.
  • Mix the two well. Place  the powder in a clean cosmetics container with a lid, and use a cotton pad, or one or those fluffy pads used for applying powder facial foundation.
  • After taking a shower, fluff your underarms and any perspiration-active areas with this mixture.
  • P.S. If you have been using artificial deodorants for a long time, be patient while the body cleans itself. At first you might think the Alum-Musk mixture is not working out because you are basically smelling, but that’s because all the blocked perspiration is now to free to leave your body. These toxins have a bad smell, but after a while when the new perspiration is now dancing with the alum you will smell fresh and quite different than before.

Alum sprayer

Pic via realsimple.com

My grandma’s great grandmothers, back to God-knows-when, used alum and they always smelled superb. In fact if you have a sensitive nose you can always tell the difference between a modern home, around the Levant where I live, and a traditional home that uses natural soaps, alum, rosewater, and all the natural scents & cleaning materials that really make everything smell better.

Another simple alum recipe is making your own alum spray:

  • Crush the alum crystals
  • Mix them with water in a bottle sprayer
  • Spray your underarms, feet, and any sweat-active areas, right after you shower.

Alum with essential oils

You can always experiment with creating your own scented alum powder. If you have a good quality rose/musk/jasmine essential oil, you can:

Pic via ashitherapy.com

  • Crush the alum…
  • add a few drops of essential oil to the alum crystals and mix well
  • use like you use talc.
The Frugal Crafter Blog

Groovy craft projects, crafty recipes and other artsy stuff.

Illustrated Bites

an illustrated food blog

Dream Green DIY

An indie handmade jewelry & crafts creation house

from Hell to Breakfast

bustin' a 5-year-old crafts hoard, one bloody button at a time

W E S E E R A I N B O W S

//dream in color//

Stuff I’ve been drawing

Illustration and graphic design - don’t be shy and say hi at mercedesleon@merchesico.com

EASYBAKED

a collection of recipes

What Katie Made

The best DIY projects. Your wallet will thank me later.

The Importance of Being Quirky

May Your Days be Filled with Love, Good Health, Smiles, and Umbrella Drinks!

thehighnotedotnet

vintage music and the high notes of life

Life.Style.etc

Chic, unique and inspired ideas... as spotted by the team at Livingetc

My So Called Crafty Life

The life and times of a craft addict

The Window Display Blog

Images and words on the best displays around London

If We Took A Holiday

108 days around the world

Niki Fulton

looking at colour and form

The Unexpected Chic - Interior Design, Decorating, Inspiration for home

Fresh interior design, decorating ideas and inspiration for your home

Custom Art and Design

Neurotic. A Jane-of-all-trades. Genetically diverse. Interior designer. Artist. Upcycler. Volunteer. Dreamer...♥

hovercraftdoggy

A curated glimpse into a world of infinite beauty and creativity.

Parcel Post

An indie handmade jewelry & crafts creation house

button, button ...

I embroider and knit. A lot.

paper, plate, and plane

A world of crafting, entertaining, and travels.

A Pocketful of Notes

Sharing ideas and thoughts...one note at a time.

Jackie's blog

Sharing with you a little stampin' and scrappin'

Re-Creations Project

Upcycling and Craft for All Abilities

buubok

Modern Knits for Interior

Tiny Octopus Designs

Selling Cephalopods

stashburning

what I make, thrifting and more

Thrift Shopping Buzz

Stay stylish & fabulous without spending a fortune. One store at a time.

Sweet Pea's Kitchen

A food blog with healthy simple and tasty recipes.

twistedsisters

Sisterhood of the creative force!

Butterscotch Tabby

A journal where I contemplate, outloud, what I may "make" rather than "buy" that remains useful, yet attractive little pieces of art. A review blog that combined with a little frugality can greatly enrich your lifestyle. Check out my store for a source of low cost creative supplies: www.butterscotchtabby.com